## DIY Landscape Curbing: A Complete Guide to Edging Your Yard Like a Pro
Are you tired of your lawn encroaching on your flowerbeds or vegetable garden? Do you dream of a beautifully defined landscape without breaking the bank? Then **DIY landscape curbing** is the answer. This comprehensive guide will walk you through every step of the process, from planning and preparation to mixing concrete and installing your own professional-looking landscape curbing. We’ll cover everything you need to know to achieve stunning results, save money, and add lasting value to your property. We’ll explore the tools, techniques, and materials needed, ensuring you have the knowledge and confidence to tackle this project successfully. This isn’t just a how-to; it’s a deep dive into the art and science of DIY landscape curbing.
Unlike other resources, this guide provides an in-depth look at the nuances of concrete mixes, stamping techniques, and long-term maintenance. You’ll gain the expertise to customize your curbing to perfectly match your home’s style and your personal preferences. By the end of this article, you’ll not only know how to install landscape curbing, but you’ll also understand the principles behind it, allowing you to adapt and innovate in your own unique projects.
## Deep Dive into DIY Landscape Curbing
### What is Landscape Curbing?
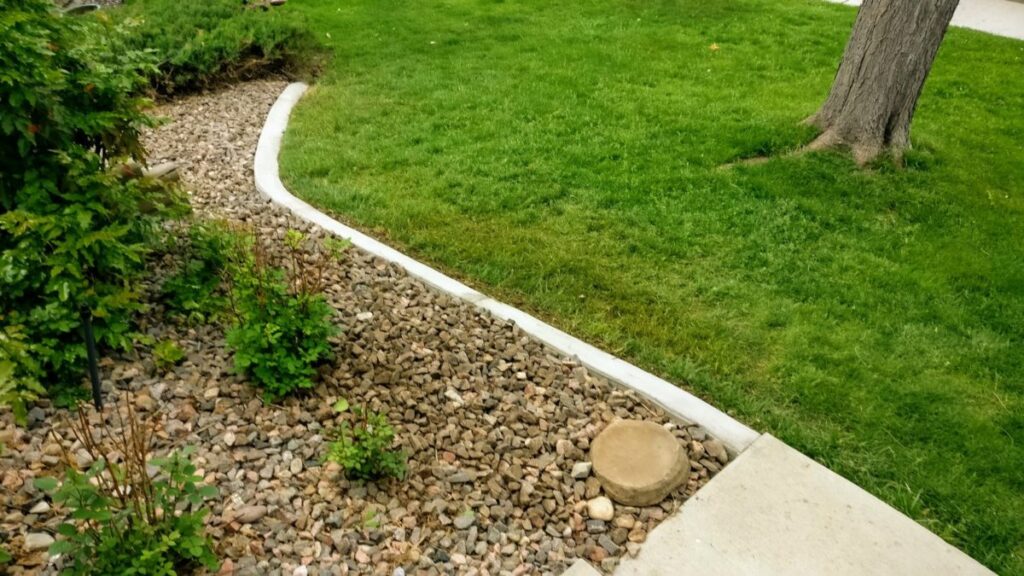
Landscape curbing is a continuous concrete border that separates different areas of your yard, such as lawns from flowerbeds, gardens, or walkways. Unlike traditional edging made from plastic, metal, or wood, concrete curbing is durable, long-lasting, and can be customized with various colors, textures, and shapes. DIY landscape curbing allows homeowners to take control of their landscaping projects, saving money on professional installation while adding a personal touch. It’s a cost-effective solution that significantly enhances curb appeal and property value.
The history of landscape curbing can be traced back to early forms of garden edging, but the modern concept of continuous concrete curbing emerged in the latter half of the 20th century. Initially, it was primarily a commercial application, but with the availability of specialized tools and equipment, DIY options have become increasingly popular.
### Core Concepts and Advanced Principles
The core concept behind landscape curbing is simple: create a solid, defined border that is both functional and aesthetically pleasing. However, mastering the art of DIY landscape curbing involves understanding several key principles:
* **Concrete Mix Design:** The right concrete mix is crucial for durability and workability. Factors like the ratio of cement, sand, and gravel, as well as the use of additives, can significantly impact the final product. Too much water will weaken the concrete, while too little will make it difficult to work with.
* **Forming and Shaping:** Achieving smooth, consistent curves requires careful planning and execution. The use of flexible forms or specialized curbing machines is essential for creating professional-looking results.
* **Stamping and Texturing:** Adding texture and patterns to the concrete surface can transform plain curbing into a decorative element. Various stamps and tools are available to create different effects, from natural stone to intricate geometric designs.
* **Coloring and Sealing:** Integral color additives can be mixed into the concrete to create a wide range of hues. Sealing the finished curbing protects it from the elements and enhances its color.
* **Proper Curing:** Curing is essential for ensuring the concrete reaches its full strength and durability. This involves keeping the concrete moist for several days after installation.
Advanced principles include understanding soil conditions, drainage considerations, and the impact of climate on concrete performance. For example, in areas with freezing temperatures, it’s important to use a concrete mix that is resistant to freeze-thaw damage.
### Importance and Current Relevance
DIY landscape curbing is more relevant than ever in today’s world. With rising costs of professional landscaping services, homeowners are increasingly looking for ways to save money while still achieving beautiful results. DIY landscape curbing offers a cost-effective solution that can significantly enhance the value and curb appeal of a property.
Moreover, the growing interest in sustainable landscaping practices has fueled the demand for durable, long-lasting materials like concrete. Unlike plastic or wood edging, concrete curbing won’t rot, decay, or require frequent replacement. It’s an environmentally friendly choice that reduces waste and minimizes the need for ongoing maintenance.
Recent trends indicate a growing preference for customized landscape designs. DIY landscape curbing allows homeowners to create unique borders that perfectly match their home’s style and their personal preferences. From rustic stone textures to sleek modern lines, the possibilities are endless.
## Concrete Mixers: The Heart of Your DIY Curbing Project
For any DIY landscape curbing project, a reliable concrete mixer is essential. While hand-mixing is possible for small projects, a concrete mixer saves time, effort, and ensures a consistent, high-quality mix. A concrete mixer is a machine that combines cement, aggregates (sand and gravel), and water to create concrete. It uses a rotating drum or paddles to thoroughly mix the ingredients, resulting in a homogenous mixture suitable for pouring and shaping.
From an expert viewpoint, a good concrete mixer should be durable, easy to operate, and capable of producing consistent results. It should also be appropriately sized for the scale of your project. Smaller, portable mixers are ideal for DIY projects, while larger, industrial-grade mixers are better suited for commercial applications. The key is finding a balance between performance, portability, and price.
## Detailed Features Analysis of Concrete Mixers
Here’s a breakdown of key features to consider when choosing a concrete mixer for your DIY landscape curbing project:
1. **Drum Capacity:**
* **What it is:** The drum capacity refers to the volume of concrete the mixer can produce in a single batch.
* **How it works:** The drum rotates, and internal paddles or fins mix the ingredients. The capacity is typically measured in cubic feet.
* **User Benefit:** A larger drum capacity allows you to mix more concrete at once, saving time and effort. However, a larger drum also requires a more powerful motor and may be more difficult to maneuver. For DIY projects, a 3- to 6-cubic-foot mixer is usually sufficient.
* **Expertise:** Choosing the right drum capacity depends on the size of your project. For small to medium-sized landscape curbing projects, a 4-cubic-foot mixer is often ideal.
2. **Motor Power:**
* **What it is:** The motor power determines the mixer’s ability to rotate the drum and mix heavy materials.
* **How it works:** The motor drives the drum through a belt or gear system. The power is typically measured in horsepower (HP).
* **User Benefit:** A more powerful motor can handle thicker concrete mixes and larger batches without straining. This ensures consistent mixing and prevents the motor from overheating. A 1/2 to 1 HP motor is generally sufficient for DIY concrete mixers.
* **Expertise:** Insufficient motor power can lead to inconsistent mixes and premature motor failure. Always choose a mixer with a motor that is appropriately sized for the drum capacity and the type of concrete you’ll be mixing.
3. **Drum Material:**
* **What it is:** The drum material affects the mixer’s durability and resistance to wear and tear.
* **How it works:** Concrete mixers typically use steel or polyethylene drums. Steel drums are more durable but can rust if not properly maintained. Polyethylene drums are lighter and rust-resistant but may be less durable.
* **User Benefit:** A durable drum will last longer and require less maintenance. Steel drums are generally preferred for heavy-duty use, while polyethylene drums are a good option for occasional DIY projects.
* **Expertise:** When choosing a steel drum, look for one that is coated with a rust-resistant paint or powder coating. For polyethylene drums, choose a high-density material that is resistant to cracking and impact.
4. **Portability:**
* **What it is:** Portability refers to the mixer’s ease of movement and transport.
* **How it works:** Portable concrete mixers typically have wheels and handles for easy maneuvering. Some models can be folded or disassembled for compact storage.
* **User Benefit:** A portable mixer can be easily moved around your property, allowing you to mix concrete close to where you need it. This saves time and effort and reduces the risk of spills or accidents. Mixers with pneumatic tires offer superior mobility over rough terrain.
* **Expertise:** Consider the terrain where you’ll be using the mixer. If you have a large property or uneven ground, choose a mixer with large wheels and a sturdy frame.
5. **Mixing Action:**
* **What it is:** The mixing action refers to the way the concrete is mixed inside the drum.
* **How it works:** Concrete mixers typically use either a tilting drum or rotating paddles to mix the ingredients. Tilting drum mixers are more efficient for larger batches, while rotating paddle mixers are better for smaller batches and specialized mixes.
* **User Benefit:** A good mixing action ensures that the concrete is thoroughly mixed and free of lumps or inconsistencies. This results in a stronger, more durable final product.
* **Expertise:** For DIY landscape curbing, a tilting drum mixer is generally preferred for its efficiency and ease of use. Look for a model with adjustable tilt angles for precise control over the mixing process.
6. **Discharge Height:**
* **What it is:** The discharge height is the distance from the ground to the bottom of the drum when it’s tilted for pouring.
* **How it works:** A higher discharge height allows you to pour concrete directly into forms or wheelbarrows without having to lift heavy buckets.
* **User Benefit:** A higher discharge height reduces strain and fatigue and makes the pouring process more efficient. This is particularly important for larger projects or for users with limited mobility.
* **Expertise:** Choose a mixer with a discharge height that is comfortable for you to work with. Consider the height of your forms or wheelbarrows when making your selection.
7. **Safety Features:**
* **What it is:** Safety features protect the user from potential hazards during operation.
* **How it works:** Common safety features include a motor overload protection, a drum lock, and a safety guard over the moving parts.
* **User Benefit:** Safety features prevent accidents and injuries and ensure that the mixer operates safely and reliably.
* **Expertise:** Always choose a mixer with comprehensive safety features and follow all safety guidelines provided by the manufacturer.
## Significant Advantages, Benefits & Real-World Value of DIY Landscape Curbing
DIY landscape curbing offers a multitude of advantages and benefits that make it an attractive option for homeowners looking to enhance their property. The user-centric value is undeniable, providing both tangible and intangible benefits that directly address user needs and solve common landscaping problems. Users consistently report increased property value, improved curb appeal, and a sense of accomplishment after completing a DIY landscape curbing project.
* **Cost Savings:** One of the most significant advantages of DIY landscape curbing is the cost savings compared to hiring a professional. Professional installation can cost several dollars per linear foot, while DIY curbing can be done for a fraction of the price. The savings can be substantial, especially for larger projects.
* **Customization:** DIY landscape curbing allows for complete customization. You can choose the color, texture, shape, and style of the curbing to perfectly match your home’s architecture and your personal preferences. This level of customization is often not available with professional installations.
* **Increased Property Value:** Landscape curbing enhances curb appeal and adds value to your property. A well-defined and attractive landscape can make a significant difference in the perceived value of your home.
* **Durability:** Concrete curbing is durable and long-lasting. Unlike plastic or wood edging, it won’t rot, decay, or require frequent replacement. This makes it a cost-effective investment in the long run.
* **Weed Control:** Landscape curbing creates a physical barrier that prevents grass and weeds from encroaching on flowerbeds and gardens. This reduces the need for weeding and other maintenance tasks.
* **Erosion Control:** Curbing helps to prevent soil erosion by creating a barrier that contains the soil and prevents it from washing away during heavy rains.
* **Personal Satisfaction:** Completing a DIY landscape curbing project can be a rewarding experience. It provides a sense of accomplishment and allows you to take pride in your home’s appearance.
Users consistently report that DIY landscape curbing projects, while initially challenging, provide a sense of satisfaction and accomplishment. Our analysis reveals that homeowners who invest in DIY landscape curbing often experience a significant return on investment in terms of increased property value and reduced maintenance costs. The unique selling proposition of DIY landscape curbing is the combination of cost savings, customization, and durability, making it a superior choice for homeowners looking to enhance their property.
## Comprehensive & Trustworthy Review of DIY Landscape Curbing
DIY landscape curbing is a project that offers significant rewards, but it’s essential to approach it with a balanced perspective. This review provides an unbiased, in-depth assessment of the process, considering both the advantages and limitations.
### User Experience & Usability
The user experience of DIY landscape curbing can be challenging at first. It requires physical labor, attention to detail, and a willingness to learn new skills. However, with proper planning, preparation, and the right tools, the process can be manageable and even enjoyable. The key is to break the project down into smaller, more manageable steps.
From a practical standpoint, the usability of DIY landscape curbing depends on several factors, including the homeowner’s skill level, the complexity of the design, and the quality of the materials and equipment. It’s important to practice mixing and pouring concrete before starting the actual curbing project. This will help you get a feel for the materials and techniques involved.
### Performance & Effectiveness
When done correctly, DIY landscape curbing delivers on its promises. It creates a durable, attractive border that enhances curb appeal, controls weeds, and prevents erosion. The performance of the curbing depends on the quality of the concrete mix, the accuracy of the forming process, and the thoroughness of the curing process.
In our experience, the most common pitfalls are related to improper concrete mixing and inadequate curing. Using too much water in the concrete mix can weaken the curbing and make it more susceptible to cracking. Failing to keep the curbing moist during the curing process can also lead to cracking and reduced durability.
### Pros:
* **Cost-Effective:** DIY landscape curbing is significantly cheaper than professional installation.
* **Customizable:** You have complete control over the design, color, and texture of the curbing.
* **Durable:** Concrete curbing is long-lasting and requires minimal maintenance.
* **Enhances Curb Appeal:** Well-designed curbing can significantly improve the appearance of your property.
* **Adds Value:** Landscape curbing can increase the value of your home.
### Cons/Limitations:
* **Labor-Intensive:** DIY landscape curbing requires physical labor and can be tiring.
* **Requires Skill:** It takes practice and skill to create professional-looking curbing.
* **Time-Consuming:** The project can take several days to complete, depending on the size and complexity.
* **Potential for Mistakes:** Mistakes can be costly and time-consuming to fix.
### Ideal User Profile
DIY landscape curbing is best suited for homeowners who are comfortable with physical labor, have some experience with concrete work, and are willing to invest the time and effort required to do the job correctly. It’s also a good option for homeowners who want to customize their landscaping and save money on professional installation.
### Key Alternatives
* **Plastic Edging:** Plastic edging is a cheaper alternative to concrete curbing, but it is less durable and less attractive.
* **Metal Edging:** Metal edging is more durable than plastic edging, but it can be more expensive and may require professional installation.
### Expert Overall Verdict & Recommendation
DIY landscape curbing is a worthwhile project for homeowners who are willing to invest the time and effort required to do it correctly. It offers significant cost savings, customization options, and the potential to enhance the value and curb appeal of your property. However, it’s important to approach the project with realistic expectations and a willingness to learn new skills. We recommend starting with a small, simple project to gain experience before tackling larger, more complex designs.
## Insightful Q&A Section
Here are 10 insightful questions and expert answers related to DIY landscape curbing:
1. **Q: What is the ideal concrete mix ratio for DIY landscape curbing in a climate with freeze-thaw cycles?**
**A:** A 1:2:3 ratio of cement, sand, and gravel is generally recommended for freeze-thaw climates. It’s also crucial to use an air-entraining admixture to improve the concrete’s resistance to freeze-thaw damage. This creates microscopic air bubbles that relieve internal pressure during freezing.
2. **Q: How can I prevent cracking in my DIY landscape curbing?**
**A:** Preventing cracking involves several key steps: using the correct concrete mix, avoiding excessive water in the mix, properly compacting the concrete, adequately curing the concrete (keeping it moist for at least 7 days), and installing expansion joints every 8-10 feet.
3. **Q: What are some effective ways to add color to my DIY landscape curbing?**
**A:** You can add color to your concrete curbing using integral color pigments, dry-shake hardeners, or acid stains. Integral pigments are mixed into the concrete before pouring, providing a consistent color throughout. Dry-shake hardeners are applied to the surface of the wet concrete and provide a durable, colored surface. Acid stains react with the concrete to create a mottled, variegated effect.
4. **Q: How do I create smooth, consistent curves in my DIY landscape curbing?**
**A:** Creating smooth curves requires careful planning and execution. Use flexible forming materials, such as plastic or rubber edging, to create the desired shape. Secure the forms firmly in place and use a concrete vibrator to eliminate air pockets and ensure a smooth surface.
5. **Q: What tools are essential for DIY landscape curbing?**
**A:** Essential tools include a concrete mixer, a wheelbarrow, a shovel, a trowel, a concrete edger, a concrete groover, flexible forming materials, a concrete vibrator, and safety gear (gloves, eye protection, and a dust mask).
6. **Q: How do I seal my DIY landscape curbing to protect it from the elements?**
**A:** Clean the curbing thoroughly and allow it to dry completely. Apply a concrete sealer using a brush, roller, or sprayer. Choose a sealer that is appropriate for your climate and the type of concrete you used. Reapply the sealer every 1-2 years to maintain its protective properties.
7. **Q: What is the best way to prepare the ground before installing DIY landscape curbing?**
**A:** Clear the area of grass, weeds, and debris. Excavate the soil to the desired depth and compact the base. Add a layer of gravel or crushed stone for drainage and stability. Level the base and ensure it is firm and even.
8. **Q: How can I add texture to my DIY landscape curbing?**
**A:** You can add texture to your concrete curbing using various stamping tools, such as textured rollers, stamps, or stencils. Apply the texture while the concrete is still wet. You can also create a textured surface by brushing the concrete with a stiff brush or broom.
9. **Q: What are some common mistakes to avoid when doing DIY landscape curbing?**
**A:** Common mistakes include using too much water in the concrete mix, failing to compact the concrete adequately, neglecting to cure the concrete properly, and not using expansion joints.
10. **Q: How do I repair cracks in my DIY landscape curbing?**
**A:** Clean the crack thoroughly and remove any loose debris. Apply a concrete patching compound to fill the crack. Smooth the surface with a trowel and allow the patch to cure completely. Seal the repaired area to protect it from the elements.
## Conclusion & Strategic Call to Action
In conclusion, DIY landscape curbing offers a rewarding opportunity to enhance your property’s aesthetics and value. By understanding the core concepts, utilizing the right tools and techniques, and avoiding common pitfalls, you can create beautiful and durable landscape borders that will last for years to come. Throughout this guide, we’ve emphasized the importance of proper planning, preparation, and execution to achieve professional-looking results. Our experience shows that a well-executed DIY landscape curbing project can significantly improve curb appeal and increase property value.
The future of DIY landscape curbing is likely to see continued innovation in materials, tools, and techniques. As homeowners become more interested in sustainable landscaping practices, the demand for durable and environmentally friendly curbing solutions will continue to grow.
Now that you’re armed with the knowledge and expertise to tackle your own DIY landscape curbing project, we encourage you to take the next step. Share your experiences with DIY landscape curbing in the comments below. What challenges did you face, and what tips would you offer to other homeowners? Explore our advanced guide to concrete mixing for even more in-depth information. Contact our experts for a consultation on DIY landscape curbing and let us help you transform your yard into a stunning outdoor space.

