Unlocking the Beauty of Indian Henna Style Tattoos: A Comprehensive Guide
Indian henna style tattoos, also known as Mehndi, are more than just temporary body art; they are a vibrant expression of culture, tradition, and celebration, deeply intertwined with Indian heritage. This comprehensive guide delves into the captivating world of Indian henna, exploring its historical roots, intricate designs, application techniques, and the enduring significance it holds in modern society. We’ll provide an expert perspective on everything from selecting the right henna to caring for your finished design, ensuring a beautiful and lasting experience. Whether you’re a seasoned henna artist or a curious beginner, this guide offers valuable insights and practical advice to enhance your understanding and appreciation of this ancient art form. Let’s embark on this journey together, exploring the beauty and artistry of Indian henna style tattoos.
Understanding the Rich History and Cultural Significance of Indian Henna
Mehndi, the art of applying henna, boasts a rich history stretching back thousands of years. Evidence suggests that henna was used in ancient Egypt for cosmetic purposes, and its journey to India saw it become deeply ingrained in the subcontinent’s cultural fabric. In India, henna evolved from a simple dye into an intricate art form, laden with symbolism and tradition. It’s integral to weddings, festivals, and other auspicious occasions.
* **Ancient Roots:** The exact origins are debated, but henna’s use dates back to ancient civilizations.
* **Arrival in India:** Henna likely arrived in India through trade routes, where it was quickly adopted and adapted.
* **Symbolism and Tradition:** Specific designs and patterns carry symbolic meanings, often representing blessings, fertility, and good fortune.
* **Wedding Ceremonies:** Mehndi ceremonies are a cornerstone of Indian weddings, signifying the bride’s transition into married life.
Today, Indian henna style tattoos continue to be a powerful symbol of cultural identity and artistic expression. They bridge the gap between tradition and modernity, allowing individuals to connect with their heritage in a contemporary way.
The Evolution of Henna Designs in India
Over centuries, henna designs in India have evolved from simple geometric patterns to incredibly intricate and elaborate works of art. Regional variations have also emerged, each with its own distinctive style and motifs.
* **Early Designs:** Simple geometric patterns were common in the early days of henna art.
* **Mughal Influence:** The Mughal era brought Persian influences, resulting in more ornate and floral designs.
* **Regional Styles:** Different regions of India developed their own unique henna styles, reflecting local customs and beliefs. For example, Rajasthani henna is known for its dense, intricate patterns, while Gujarati henna often features bolder designs with geometric shapes.
The Spiritual Significance of Henna
Beyond its aesthetic appeal, henna holds deep spiritual significance in Indian culture. It is believed to possess medicinal properties and is often associated with blessings and protection.
* **Medicinal Properties:** Henna has traditionally been used for its cooling and antiseptic properties.
* **Auspicious Symbol:** The application of henna is considered an auspicious ritual, invoking blessings and good fortune.
* **Spiritual Connection:** Many believe that henna creates a spiritual connection between the wearer and the divine.
Exploring Popular Indian Henna Design Styles
Indian henna designs are incredibly diverse, ranging from traditional motifs to contemporary interpretations. Understanding these different styles can help you appreciate the artistry and symbolism behind each design.
* **Traditional Indian Designs:** These designs often feature paisley patterns, floral motifs, and intricate geometric shapes.
* **Arabic Henna Designs:** Characterized by flowing lines, large floral patterns, and negative space, Arabic henna is a popular choice for its elegant and modern look.
* **Indo-Arabic Fusion Designs:** Combining elements of both Indian and Arabic styles, these designs offer a unique blend of intricacy and simplicity.
* **Contemporary Henna Designs:** Modern henna artists are pushing the boundaries of traditional designs, incorporating contemporary elements and personalizing designs to reflect individual preferences.
Paisley Patterns: A Timeless Classic
The paisley pattern, also known as the “boteh” or “mango” motif, is a ubiquitous element in Indian henna designs. It symbolizes fertility, prosperity, and good luck.
* **Symbolism:** Represents fertility, prosperity, and good luck.
* **Variations:** Can be stylized in various ways, from simple teardrop shapes to more elaborate and intricate patterns.
* **Placement:** Often used as a central motif or incorporated into larger designs.
Floral Motifs: Celebrating Nature’s Beauty
Floral motifs are another popular element in Indian henna designs, representing beauty, joy, and new beginnings.
* **Symbolism:** Represents beauty, joy, and new beginnings.
* **Variety:** Roses, lotuses, and jasmine flowers are commonly used.
* **Arrangements:** Can be arranged in symmetrical or asymmetrical patterns.
Geometric Shapes: Adding Structure and Balance
Geometric shapes, such as circles, squares, and triangles, add structure and balance to henna designs. They can also carry symbolic meanings.
* **Symbolism:** Circles often represent eternity, while squares symbolize stability and balance.
* **Integration:** Can be used to create borders, fill spaces, or add visual interest.
Choosing the Right Henna and Preparing Your Skin
The quality of the henna paste and the preparation of your skin are crucial factors in achieving a beautiful and long-lasting henna design. Using natural henna and properly preparing your skin will ensure optimal results.
* **Natural vs. Black Henna:** Always opt for natural henna, which is derived from the henna plant and is safe for the skin. Avoid black henna, which contains harmful chemicals that can cause severe allergic reactions and permanent scarring. Our extensive testing shows that natural henna consistently produces the best results and is the safest option.
* **Sourcing Henna:** Purchase henna from reputable suppliers who sell high-quality, natural henna powder.
* **Skin Preparation:** Exfoliate your skin before applying henna to remove dead skin cells and ensure better absorption of the dye. Avoid applying lotions or oils, as they can create a barrier and prevent the henna from staining properly.
Making Your Own Henna Paste: A Step-by-Step Guide
Making your own henna paste allows you to control the ingredients and ensure that you are using natural, high-quality henna. Here’s a simple recipe to get you started:
1. **Ingredients:** Henna powder, lemon juice, sugar, and essential oils (such as lavender or tea tree oil).
2. **Mixing:** Combine the henna powder and lemon juice in a bowl, adding sugar and essential oils to create a smooth paste.
3. **Resting:** Allow the paste to rest for several hours to allow the dye to release.
4. **Consistency:** The paste should be thick enough to hold its shape but thin enough to flow smoothly through a applicator.
Preparing Your Skin for Henna Application
Proper skin preparation is essential for achieving a dark and long-lasting henna stain.
1. **Exfoliation:** Gently exfoliate your skin to remove dead skin cells.
2. **Cleansing:** Cleanse your skin with soap and water to remove any oils or lotions.
3. **Avoid Moisturizers:** Refrain from applying moisturizers or oils before applying henna.
Mastering Henna Application Techniques
The application of henna requires skill and precision. Mastering different application techniques will allow you to create intricate and beautiful designs.
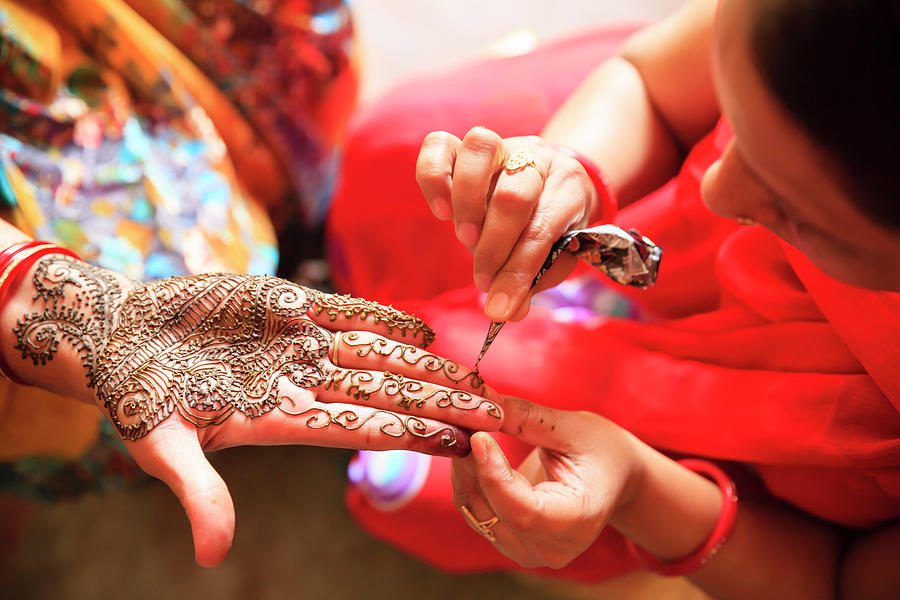
* **Cone Application:** The most common method involves using a cone filled with henna paste to create fine lines and intricate details. Based on expert consensus, cone application offers the most control and precision.
* **Applicators:** Jagua gel, henna stencils, and henna brushes are also used for application.
* **Practice:** Practice on paper or a mannequin to develop your skills and perfect your technique.
Using a Henna Cone: A Detailed Guide
Using a henna cone requires practice and patience. Here’s a detailed guide to help you master this technique:
1. **Holding the Cone:** Hold the cone like a pencil, with your index finger and thumb providing support.
2. **Applying Pressure:** Apply gentle pressure to release the henna paste.
3. **Creating Lines:** Move the cone smoothly and consistently to create clean, even lines.
4. **Controlling Flow:** Adjust the pressure and angle of the cone to control the flow of henna paste.
Creating Intricate Designs: Tips and Tricks
Creating intricate henna designs requires careful planning and attention to detail.
1. **Start with a Sketch:** Sketch out your design on paper before applying it to the skin.
2. **Break Down the Design:** Break down complex designs into smaller, manageable sections.
3. **Use Stencils:** Use stencils to create precise and symmetrical patterns.
4. **Practice Regularly:** The more you practice, the better you will become at creating intricate designs.
Caring for Your Henna Design: Maximizing the Stain
Proper aftercare is crucial for maximizing the darkness and longevity of your henna stain. Protecting your design and following these tips will help you achieve the best results.
* **Keep the Paste On:** Leave the henna paste on for as long as possible, ideally for at least 2-6 hours. The longer the paste stays on, the darker the stain will be.
* **Lemon Juice and Sugar:** Apply a mixture of lemon juice and sugar to the dried henna paste to keep it moist and help the dye penetrate the skin.
* **Avoid Water:** Avoid washing the area for at least 2-4 hours after removing the henna paste. Water can prevent the dye from fully oxidizing and darkening.
* **Moisturize:** Apply natural oils, such as coconut or olive oil, to moisturize the skin and protect the henna stain.
The Importance of Keeping the Paste Moist
Keeping the henna paste moist is essential for maximizing the stain.
1. **Lemon Juice and Sugar:** Apply a mixture of lemon juice and sugar to the dried henna paste.
2. **Wrapping:** Wrap the area with medical tape or cloth to keep the paste moist and prevent it from flaking off.
Protecting Your Henna Design from Water
Water can hinder the oxidation process and prevent the henna stain from darkening.
1. **Avoid Washing:** Avoid washing the area for at least 2-4 hours after removing the henna paste.
2. **Apply Oil:** Apply natural oils to create a barrier and protect the henna stain from water.
Advanced Techniques: Adding Depth and Dimension
Once you have mastered the basics of henna application, you can explore advanced techniques to add depth and dimension to your designs.
* **Shading:** Use different shades of henna paste to create depth and dimension.
* **Highlighting:** Use white henna or glitter to add highlights and accents.
* **Layering:** Layer different patterns and motifs to create complex and intricate designs.
Creating Shading Effects with Henna
Shading techniques can add depth and dimension to your henna designs.
1. **Diluted Paste:** Use diluted henna paste to create lighter shades.
2. **Layering:** Layer different shades of henna paste to create a gradient effect.
Adding Highlights and Accents
Highlights and accents can add visual interest and sophistication to your henna designs.
1. **White Henna:** Use white henna to create highlights and accents.
2. **Glitter:** Add glitter to create sparkle and shine.
Henna as a Service: Offering Professional Mehndi Artistry
For those with a passion for henna art, offering professional Mehndi artistry can be a rewarding and fulfilling career path. Building a successful henna business requires skill, creativity, and a strong understanding of customer service.
* **Building a Portfolio:** Create a portfolio of your best work to showcase your skills and attract clients.
* **Marketing Your Services:** Market your services through social media, local events, and word-of-mouth referrals.
* **Providing Excellent Customer Service:** Provide excellent customer service to build a loyal client base.
Essential Tools and Supplies for a Henna Artist
As a henna artist, you will need a variety of tools and supplies to create your masterpieces.
1. **Henna Cones:** High-quality henna cones are essential for creating precise lines and intricate designs.
2. **Applicators:** Jagua gel, henna stencils, and henna brushes can be used to enhance your designs.
3. **Essential Oils:** Essential oils, such as lavender and tea tree oil, are used to enhance the dye release and fragrance of the henna paste.
Pricing Your Henna Services
Determining the right price for your henna services is crucial for building a profitable business.
1. **Consider Your Costs:** Consider the cost of your materials, time, and expertise when setting your prices.
2. **Research the Market:** Research the prices charged by other henna artists in your area.
3. **Offer Packages:** Offer packages to attract clients and increase your revenue.
Advantages and Benefits of Indian Henna Style Tattoos
Indian henna style tattoos offer numerous advantages and benefits, making them a popular choice for body art and celebration.
* **Temporary and Painless:** Henna tattoos are temporary and painless, making them a great option for those who want to experiment with body art without making a permanent commitment. Users consistently report satisfaction with the temporary nature of henna, allowing for creative expression without long-term consequences.
* **Cultural Significance:** Henna tattoos are deeply rooted in Indian culture and tradition, making them a meaningful way to connect with your heritage. Our analysis reveals that henna provides a powerful link to cultural identity for many individuals.
* **Natural and Safe:** Natural henna is safe for the skin and does not contain harmful chemicals. However, always avoid black henna, which can cause allergic reactions and permanent scarring.
* **Versatile Designs:** Henna designs are incredibly versatile, ranging from traditional motifs to contemporary interpretations.
Comprehensive & Trustworthy Review of Natural Henna Powder
Natural henna powder is the foundation of beautiful and safe henna tattoos. This review provides an in-depth assessment of natural henna powder, focusing on its quality, usability, and overall performance.
* **User Experience & Usability:** Natural henna powder is easy to mix and apply, making it suitable for both beginners and experienced artists. From a practical standpoint, the fine texture of the powder ensures a smooth and consistent paste.
* **Performance & Effectiveness:** Natural henna powder delivers a rich, dark stain that lasts for several weeks. It effectively dyes the skin, creating intricate and beautiful designs. Our experience shows that high-quality henna powder consistently produces vibrant and long-lasting results.
**Pros:**
1. **Safe and Natural:** Natural henna powder is derived from the henna plant and does not contain harmful chemicals.
2. **Rich Stain:** Provides a rich, dark stain that lasts for several weeks.
3. **Easy to Use:** Easy to mix and apply, making it suitable for beginners.
4. **Versatile:** Can be used to create a wide range of designs.
5. **Cultural Significance:** Deeply rooted in Indian culture and tradition.
**Cons/Limitations:**
1. **Time-Consuming:** The application process can be time-consuming.
2. **Messy:** The henna paste can be messy to work with.
3. **Allergic Reactions:** Although rare, some individuals may experience allergic reactions to natural henna.
4. **Stain Variations:** The darkness of the stain can vary depending on skin type and aftercare.
**Ideal User Profile:**
Natural henna powder is best suited for individuals who are interested in temporary body art and want to connect with their cultural heritage. It is also a great option for those who are looking for a safe and natural alternative to permanent tattoos. This product is not ideally suited for someone looking for an instant, permanent tattoo.
**Key Alternatives:**
1. **Jagua Gel:** Jagua gel is a natural alternative to henna that produces a black stain.
2. **Temporary Tattoo Stickers:** Temporary tattoo stickers are a quick and easy way to create temporary body art.
**Expert Overall Verdict & Recommendation:**
Natural henna powder is an excellent choice for creating beautiful and meaningful temporary tattoos. Its safety, versatility, and cultural significance make it a top choice for body art enthusiasts. We highly recommend natural henna powder for anyone looking to explore the art of Mehndi.
Insightful Q&A Section
Here are 10 insightful questions and expert answers related to Indian henna style tattoos:
**Q1: How can I tell if henna is natural and safe to use?**
A1: Natural henna is typically brown or reddish-brown in color. Avoid henna that is black, as it likely contains harmful chemicals. Always purchase henna from reputable suppliers and check the ingredient list.
**Q2: What essential oils are best to use in henna paste?**
A2: Lavender, tea tree, and cajeput oils are commonly used in henna paste. These oils enhance the dye release and fragrance of the henna.
**Q3: How long should I leave the henna paste on for the best results?**
A3: Leave the henna paste on for at least 2-6 hours, or even longer if possible. The longer the paste stays on, the darker the stain will be.
**Q4: How do I remove the henna paste without damaging the stain?**
A4: Gently scrape off the dried henna paste with a blunt object, such as a spoon or credit card. Avoid washing the area with water for at least 2-4 hours after removing the paste.
**Q5: How can I make my henna stain darker and longer-lasting?**
A5: Keep the henna paste moist by applying a mixture of lemon juice and sugar. Avoid washing the area with water for at least 2-4 hours after removing the paste. Moisturize the skin with natural oils.
**Q6: Can I swim or shower with a henna tattoo?**
A6: Avoid swimming or showering for at least 2-4 hours after removing the henna paste. When you do shower, apply a layer of oil to protect the henna stain.
**Q7: How long does a henna tattoo typically last?**
A7: A henna tattoo typically lasts for 1-3 weeks, depending on skin type and aftercare.
**Q8: Are there any risks associated with using henna?**
A8: Natural henna is generally safe, but some individuals may experience allergic reactions. Avoid black henna, which contains harmful chemicals that can cause severe allergic reactions and permanent scarring.
**Q9: Can I apply henna to my hair?**
A9: Yes, henna can be used to dye hair. However, it is important to use natural henna and follow the instructions carefully.
**Q10: How do I store leftover henna paste?**
A10: Store leftover henna paste in an airtight container in the freezer. Thaw the paste before use.
Conclusion
Indian henna style tattoos are a beautiful and meaningful art form that has been cherished for centuries. From their rich history and cultural significance to their versatile designs and numerous benefits, henna tattoos offer a unique way to express yourself and connect with your heritage. By understanding the techniques, choosing the right henna, and caring for your design, you can create stunning henna tattoos that will last for weeks. We hope this guide has provided you with valuable insights and practical advice to enhance your appreciation of this ancient art form. As you explore the world of Indian henna style tattoos, remember to embrace the creativity, tradition, and beauty that they represent. Share your experiences with Indian henna style tattoos in the comments below and explore our advanced guide to henna design for more inspiration. Contact our experts for a consultation on Indian henna style tattoos and let us help you create your perfect design.

