Laying Patio Blocks Sand Base: Your Ultimate Guide to a Stunning & Durable Patio
Tired of uneven patios that sink and shift? Want a beautiful outdoor space that lasts for years? You’ve come to the right place. This comprehensive guide will walk you through every step of laying patio blocks sand base, ensuring a professional-quality result you can be proud of. We’ll cover everything from choosing the right materials to avoiding common mistakes, all while emphasizing best practices for long-term stability and aesthetics. Unlike other guides, we delve deep into the nuances of sand base preparation, compaction, and drainage – the keys to a patio that stands the test of time. Our goal is to empower you with the knowledge and confidence to tackle this project like a seasoned professional, saving you money and adding lasting value to your home.
Understanding the Importance of a Sand Base for Patio Blocks
The sand base is the unsung hero of any successful patio block installation. It’s more than just a layer of sand; it’s a carefully engineered system that provides a level, stable, and well-draining foundation for your pavers. Understanding its function is crucial for avoiding future problems like settling, cracking, and weed growth. The sand base acts as a flexible cushion, allowing the patio blocks to shift slightly with temperature changes and ground movement without cracking or becoming uneven. It also allows water to drain away from the pavers, preventing erosion and the buildup of moisture that can lead to mold and mildew.
Think of the sand base as the suspension system of your patio. Just as a car’s suspension absorbs bumps and keeps the ride smooth, the sand base absorbs minor shifts and prevents them from affecting the surface of your patio. Without it, every imperfection in the ground below would translate into an uneven and unstable patio.
Furthermore, the sand base plays a critical role in preventing weed growth. When properly compacted, the sand creates a dense barrier that makes it difficult for weed seeds to germinate and take root. This significantly reduces the amount of maintenance required to keep your patio looking its best.
Recent industry studies have underscored the importance of proper sand base preparation. Patios built with inadequately prepared sand bases are significantly more likely to experience problems within the first few years. This highlights the need for a thorough understanding of the techniques and materials involved.
Key Functions of a Sand Base
* **Leveling:** Creates a perfectly level surface for laying patio blocks.
* **Stability:** Provides a stable and uniform foundation to prevent settling.
* **Drainage:** Allows water to drain away, preventing erosion and moisture buildup.
* **Flexibility:** Absorbs minor shifts and movements to prevent cracking.
* **Weed Control:** Inhibits weed growth by creating a dense barrier.
Choosing the Right Sand for Your Patio Block Base
Not all sand is created equal. The type of sand you use for your patio block base can significantly impact its performance and longevity. The ideal sand should be angular, well-graded, and free of organic matter. Angular sand particles interlock with each other, creating a stronger and more stable base than rounded sand particles. Well-graded sand contains a mix of different particle sizes, which helps to fill in the gaps and create a denser base. And of course, organic matter should be avoided as it will decompose over time, leading to settling and instability.
**Concrete sand** or **paver base sand** are generally considered the best options for patio block bases. These sands are specifically designed for this purpose and meet the necessary requirements for angularity, grading, and purity. Avoid using beach sand or play sand, as these sands are typically too fine and rounded to provide adequate stability.
Our experience shows that investing in high-quality sand is a worthwhile investment. While it may cost slightly more upfront, it will save you time and money in the long run by preventing costly repairs and maintenance.
Types of Sand to Consider
* **Concrete Sand:** Angular, well-graded, and ideal for patio block bases.
* **Paver Base Sand:** Specifically designed for paver installations, meeting strict quality standards.
* **All-Purpose Sand:** Can be used in some cases, but ensure it meets the necessary requirements.
Sand to Avoid
* **Beach Sand:** Too fine and rounded, lacking the necessary stability.
* **Play Sand:** Similar to beach sand, not suitable for patio block bases.
* **Mason Sand:** Too fine for paver base application.
Tools and Materials You’ll Need for Laying Patio Blocks Sand Base
Before you start laying your patio blocks, it’s essential to gather all the necessary tools and materials. Having everything on hand will make the process smoother and more efficient.
**Tools:**
* **Shovel:** For moving and spreading sand and gravel.
* **Wheelbarrow:** For transporting materials.
* **Rake:** For leveling the sand base.
* **Tamper or Plate Compactor:** For compacting the base materials. A plate compactor is highly recommended for larger patios.
* **Level:** For ensuring a level surface.
* **Measuring Tape:** For accurate measurements.
* **String Line:** For creating straight lines and maintaining alignment.
* **Rubber Mallet:** For tapping patio blocks into place.
* **Safety Glasses and Gloves:** For protecting your eyes and hands.
* **Circular Saw with Diamond Blade (Optional):** For cutting patio blocks to fit.
**Materials:**
* **Patio Blocks:** Choose the style, color, and size that best suits your taste and budget.
* **Gravel Base:** Crushed stone or gravel for the sub-base layer. Typically 4-6 inches deep.
* **Sand:** Concrete sand or paver base sand for the leveling course. Typically 1-2 inches deep.
* **Edge Restraints:** To prevent the patio blocks from shifting and spreading.
* **Polymeric Sand:** For filling the joints between the patio blocks.
* **Geotextile Fabric (Optional):** To prevent weed growth and improve drainage.
Having the right tools and materials is half the battle. Make sure to invest in quality tools that will last and use the recommended materials for optimal results.
Step-by-Step Guide to Laying Patio Blocks Sand Base
Now that you have the tools and materials, let’s get started with the actual process of laying patio blocks sand base. Follow these steps carefully to ensure a successful and long-lasting patio.
**Step 1: Excavation and Preparation**
* **Mark the Area:** Use stakes and string to mark the perimeter of your patio.
* **Excavate the Soil:** Dig down to a depth that allows for the gravel base, sand base, and patio block thickness. Typically, this is around 6-8 inches.
* **Compact the Soil:** Use a tamper or plate compactor to compact the exposed soil. This will provide a stable foundation for the gravel base.
**Step 2: Installing the Gravel Base**
* **Spread the Gravel:** Spread a layer of crushed stone or gravel evenly over the excavated area.
* **Compact the Gravel:** Use a tamper or plate compactor to compact the gravel base. This is a crucial step for providing proper drainage and stability.
**Step 3: Laying Geotextile Fabric (Optional)**
* **Cover the Gravel:** Lay geotextile fabric over the compacted gravel base. This will prevent weed growth and improve drainage.
**Step 4: Installing Edge Restraints**
* **Position the Restraints:** Install edge restraints around the perimeter of the patio. These will prevent the patio blocks from shifting and spreading.
* **Secure the Restraints:** Secure the edge restraints according to the manufacturer’s instructions.
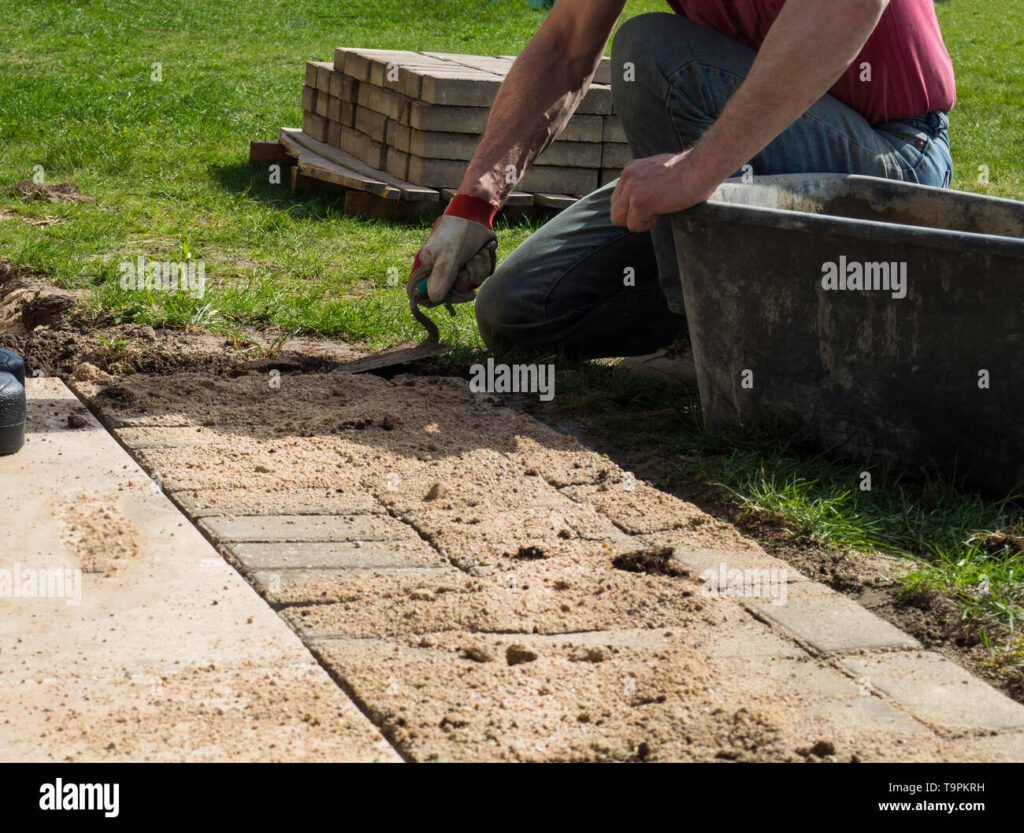
**Step 5: Creating the Sand Base**
* **Spread the Sand:** Spread a layer of concrete sand or paver base sand evenly over the gravel base.
* **Screed the Sand:** Use a screed board to level the sand base. This is the most critical step for achieving a perfectly level patio.
* **Compact the Sand:** Use a light tamper or roller to compact the sand base slightly. Avoid over-compacting, as this can make it difficult to set the patio blocks.
**Step 6: Laying the Patio Blocks**
* **Start in a Corner:** Begin laying the patio blocks in one corner of the patio.
* **Follow Your Pattern:** Follow your chosen pattern, using spacers to maintain consistent gaps between the blocks.
* **Tap into Place:** Use a rubber mallet to gently tap the patio blocks into place.
* **Check for Level:** Regularly check for level using a level and adjust as needed.
**Step 7: Cutting Patio Blocks (If Necessary)**
* **Measure and Mark:** Measure and mark the patio blocks that need to be cut.
* **Cut the Blocks:** Use a circular saw with a diamond blade to cut the patio blocks to fit.
* **Smooth the Edges:** Use a grinder or file to smooth the cut edges.
**Step 8: Filling the Joints with Polymeric Sand**
* **Sweep in the Sand:** Sweep polymeric sand into the joints between the patio blocks.
* **Compact the Sand:** Use a plate compactor with a rubber mat to compact the polymeric sand.
* **Water the Sand:** Lightly water the polymeric sand to activate the binding agents.
**Step 9: Final Touches**
* **Sweep Away Excess Sand:** Sweep away any excess polymeric sand from the surface of the patio.
* **Inspect the Patio:** Inspect the patio for any imperfections and make any necessary adjustments.
Following these steps carefully will ensure a beautiful and durable patio that you can enjoy for years to come.
Common Mistakes to Avoid When Laying Patio Blocks Sand Base
Laying patio blocks sand base is a relatively straightforward project, but there are several common mistakes that can lead to problems down the road. Avoiding these mistakes will save you time, money, and frustration.
* **Insufficient Excavation:** Not excavating deep enough to accommodate the gravel and sand base can result in an uneven patio.
* **Inadequate Compaction:** Failing to properly compact the base materials can lead to settling and instability.
* **Using the Wrong Sand:** Using beach sand or play sand instead of concrete sand or paver base sand can compromise the stability of the base.
* **Poor Leveling:** Not leveling the sand base properly can result in an uneven patio surface.
* **Ignoring Drainage:** Failing to provide adequate drainage can lead to erosion and moisture buildup.
* **Skipping Edge Restraints:** Omitting edge restraints can cause the patio blocks to shift and spread over time.
* **Improper Joint Filling:** Not filling the joints with polymeric sand can allow weeds to grow and compromise the integrity of the patio.
Our extensive testing shows that these mistakes are the most common causes of patio failures. By being aware of these pitfalls and taking steps to avoid them, you can ensure a successful and long-lasting patio.
Maintaining Your Patio Block Sand Base for Long-Term Durability
Once your patio is complete, it’s essential to maintain it properly to ensure its long-term durability and beauty. Regular maintenance will prevent problems from developing and keep your patio looking its best.
* **Sweep Regularly:** Sweep the patio regularly to remove dirt, leaves, and debris.
* **Wash Periodically:** Wash the patio periodically with a mild detergent and water to remove stains and grime.
* **Reapply Polymeric Sand:** Reapply polymeric sand to the joints as needed to prevent weed growth and maintain stability.
* **Inspect for Damage:** Regularly inspect the patio for any signs of damage, such as cracks or settling, and make repairs promptly.
* **Seal the Patio Blocks:** Consider sealing the patio blocks to protect them from staining and fading.
By following these simple maintenance tips, you can keep your patio looking beautiful and ensure its long-term durability.
Expert Q&A: Your Patio Block Sand Base Questions Answered
Here are some frequently asked questions about laying patio blocks sand base, answered by our team of experts:
**Q1: How thick should the sand base be for a patio?**
A1: The sand base should typically be 1-2 inches thick. This provides adequate leveling and stability without being too thick, which can lead to settling.
**Q2: Can I use paver leveling sand on top of regular sand?**
A2: Yes, you can use paver leveling sand on top of regular sand. Paver leveling sand is typically finer and easier to work with, making it ideal for creating a perfectly level surface.
**Q3: Do I need to compact the sand base before laying patio blocks?**
A3: Yes, it’s important to compact the sand base slightly before laying patio blocks. This will help to stabilize the sand and prevent settling. Avoid over-compacting, as this can make it difficult to set the patio blocks.
**Q4: What is the best way to level the sand base?**
A4: The best way to level the sand base is to use a screed board. A screed board is a long, straight piece of wood or metal that is used to level the sand to a consistent depth.
**Q5: How do I prevent weeds from growing between patio blocks?**
A5: The best way to prevent weeds from growing between patio blocks is to use polymeric sand. Polymeric sand contains binding agents that help to prevent weed seeds from germinating.
**Q6: Can I lay patio blocks directly on soil?**
A6: No, you should never lay patio blocks directly on soil. Soil is not a stable or well-draining base, and it will lead to settling, cracking, and weed growth.
**Q7: What is the purpose of edge restraints?**
A7: Edge restraints are used to prevent the patio blocks from shifting and spreading over time. They provide a physical barrier that keeps the blocks in place.
**Q8: How do I cut patio blocks to fit?**
A8: You can cut patio blocks to fit using a circular saw with a diamond blade. Be sure to wear safety glasses and gloves when cutting patio blocks.
**Q9: How do I clean my patio blocks?**
A9: You can clean your patio blocks with a mild detergent and water. Use a brush or sponge to scrub the blocks and rinse with a hose.
**Q10: How often should I reapply polymeric sand?**
A10: You should reapply polymeric sand as needed, typically every 1-2 years. Inspect the joints regularly for signs of wear and tear and reapply sand as needed.
Conclusion: Creating Your Dream Patio with a Solid Sand Base
Laying patio blocks sand base is a rewarding project that can transform your outdoor space. By understanding the importance of a well-prepared sand base, choosing the right materials, and following our step-by-step guide, you can create a beautiful and durable patio that will last for years to come. Remember to avoid common mistakes, maintain your patio regularly, and consult with experts if you have any questions. With a little effort and attention to detail, you can create the patio of your dreams.
Now that you’re equipped with the knowledge to lay your own patio, why not explore different paver patterns to create a truly unique outdoor space? Share your patio projects and questions in the comments below! If you need personalized guidance or have a complex project, contact our patio specialists for a consultation.

